What machine can make npk 17:17:17 fertilizer

Introduction

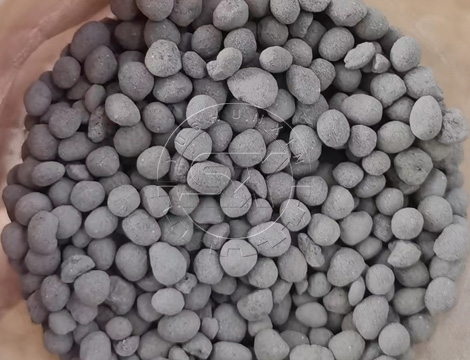
NPK 17:17:17 fertilizer is a balanced nutrient source containing equal proportions of Nitrogen (N), Phosphorus (P), and Potassium (K). This type of fertilizer is widely used in agriculture to promote healthy plant growth and improve crop yields. To produce NPK 17:17:17 fertilizer, various machinery and equipment are employed, each playing a crucial role in ensuring the final product meets the required standards. In this passage, we will explore the different machines involved in the production of NPK 17:17:17 fertilizer, highlighting their functions and importance in the manufacturing process.

17 17 17 npk fertilizer making machine

Raw Material Preparation

Crushing Machine

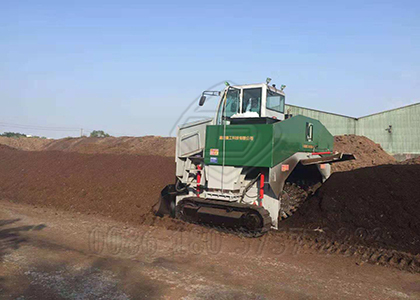
The production process starts with the preparation of raw materials, which include nitrogen sources like urea or ammonium nitrate, phosphorus sources such as superphosphate, and potassium sources like potassium chloride. These raw materials often come in large lumps or granules, which need to be crushed into finer particles. Crushing machines, such as jaw crushers or hammer mills, are used to achieve the desired particle size, ensuring that the raw materials can be mixed uniformly.

Screening Machine

After crushing, the materials are passed through screening machines to separate fine particles from larger ones. This step ensures that only particles of a specific size range are used in the mixing process, contributing to the uniformity and quality of the final fertilizer product.

Mixing and Granulation

Blender or Mixer

The next step involves thoroughly mixing the raw material to create a homogeneous blend. High-efficiency blenders or mixers are employed for this purpose. These machines ensure that the nitrogen, phosphorus, and potassium sources are evenly distributed throughout the mixture, which is crucial for producing a balanced NPK 17:17:17 fertilizer.

Granulator

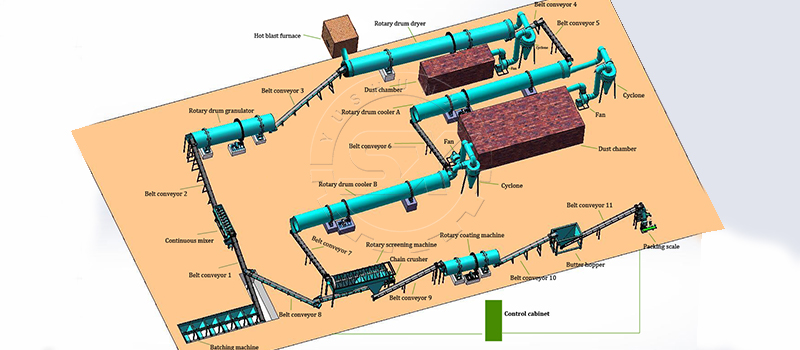
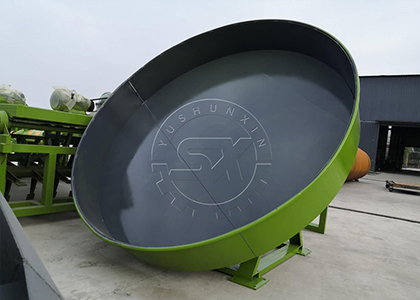
Once the raw materials are thoroughly mixed, the blend is fed into a granulator. Granulation is the process of forming the blended materials into granules or pellets. There are various types of granulators used in the fertilizer industry, including rotary drum pellet machines, disc granulators, and extrusion granulators. The choice of granulator depends on factors such as production capacity, desired granule size, and specific material properties.

Drying and Cooling

Rotary Dryer

After granulation, the fertilizer granules contain a significant amount of moisture, which needs to be removed to ensure the stability and shelf life of the product. Rotary dryers are commonly used for this purpose. These machines use hot air to evaporate moisture from the granules, resulting in a dry and free-flowing product.

Rotary Cooler

Following the drying process, the granules are usually still warm and need to be cooled before packaging. Rotary coolers are used to reduce the temperature of the granules, ensuring they are safe for handling and storage. Cooling also helps to harden the granules, reducing the risk of breakage during transportation and application.

Screening and Coating

Vibrating Screen

After cooling, the granules are passed through a vibrating screen to separate them based on size. This screening process ensures that only granules of the desired size are packaged, while oversized and undersized particles are recycled back into the production process.

Coating Machine

To enhance the quality and performance of the fertilizer, a coating machine may be used to apply a protective layer to the granules. This coating can improve the granules’ resistance to moisture, reduce dust formation, and enhance the controlled-release properties of the fertilizer.

Packaging

Automatic Packaging Machine

The final step in the production process is packaging the NPK 17:17:17 fertilizer into bags or other containers for distribution. Automatic packaging machines are used to ensure precise filling, sealing, and labeling of the containers. These machines enhance efficiency and accuracy, reducing labor costs and minimizing the risk of contamination.

Conclusion

Producing NPK 17:17:17 fertilizer involves a series of well-coordinated steps, each requiring specific machinery to ensure the final product meets the desired quality standards. From raw material preparation and mixing to granulation, drying, cooling, screening, coating, and packaging, each machine plays a vital role in the production process. By employing the right equipment, manufacturers can produce high-quality NPK 17:17:17 fertilizer that meets the nutritional needs of crops and supports sustainable agricultural practices. Visiting: https://www.fertilizerproductionproject.com/how-to-make-fertilizer-npk-171717/

How to use disc pelleting equipment to make limestone granules

Introduction

Limestone granules are a valuable commodity in various industries such as agriculture, construction, and water treatment. To produce high-quality limestone pellets, disc pelleting equipment is commonly used. This equipment is designed to transform powdered limestone into uniform granules through a process of agglomeration and compression. In this passage, we will discuss how to use disc pelleting equipment to make limestone granules effectively.

Preparing the Limestone Powder

Before using the disc pelleting equipment, it is important to prepare the limestone powder properly. The powder should be finely ground and free from impurities. It is also essential to ensure that the moisture content of the powder is within the optimal range, typically between 10-12%, to facilitate the granulation process.

Setting Up the Disc Pelleting Equipment

Once the limestone powder is prepared, the next step is to set up the disc pelleting equipment. The equipment consists of a rotating disc, a feeder, and a scraper. The disc should be set at an angle between 40-50 degrees to ensure proper granulation. The feeder should be adjusted to regulate the flow of the powder onto the disc, while the scraper should be positioned to remove any granules that stick to the disc.

The Granulation Process

The granulation process begins by feeding the limestone powder onto the rotating disc. As the disc rotates, the powder is agglomerated into small pellets due to the centrifugal force. The pellets are then compressed as they roll down the disc, resulting in uniform granules. The granules are then collected at the bottom of the disc and can be further processed or packaged as needed.

Maintenance and Troubleshooting

To ensure the efficient operation of the disc pelleting equipment, regular maintenance is required. This includes cleaning the disc, feeder, and scraper regularly to prevent clogging and buildup of material. Additionally, it is important to monitor the moisture content of the limestone powder and make adjustments as needed to maintain the optimal range. If any issues arise during the granulation process, troubleshooting may be necessary to identify and resolve the problem.

Conclusion

Disc pelleting equipment is an effective tool for producing limestone granules. By properly preparing the limestone powder, setting up the equipment, and following the granulation process, high-quality granules can be produced. Regular maintenance and troubleshooting are also essential to ensure the smooth operation of the equipment. With the right knowledge and techniques, disc pelleting equipment can be used to create a valuable product for various industries. If you want to other limestone powder pelletizer, we can also provide you with the best machines.

What equipment can make bentonite pellets

Bentonite pellets are a popular choice for a variety of applications, including drilling mud, cat litter, and as a binding agent in iron ore pelletizing. To create these pellets, specialized equipment is required to ensure that the bentonite is properly processed and formed into the desired shape and size.

Pelletizing Discs

One of the most important pieces of equipment for making bentonite pellets is a pelletizing disc. This machine consists of a large, rotating disc that is angled to encourage the bentonite to form into small, round pellets as it is fed onto the disc. The disc is equipped with adjustable plows that help to shape and size the pellets as they form. Pelletizing discs are highly efficient and can produce a large quantity of pellets in a relatively short amount of time.

Roller Presses

Roller presses are another option for making bentonite pellets. These machines use a pair of rotating rollers to compress the bentonite into pellets. The pressure exerted by the rollers helps to bind the bentonite particles together, resulting in strong, durable pellets. Roller presses are often used in the iron ore pelletizing industry, where the strength of the pellets is critical to their performance in a blast furnace.

Mixers

Before the bentonite can be formed into pellets, it must be properly mixed with any necessary additives. This is typically done in a mixer, which can be either a batch mixer or a continuous mixer. Batch mixers are used to mix a specific quantity of bentonite and additives, while continuous mixers are used to mix a steady stream of bentonite as it is fed into the machine. Mixers are an essential piece of equipment for ensuring that the bentonite is evenly distributed throughout the pellets.

Drying Equipment

Once the bentonite pellets have been formed, they must be dried to remove any excess moisture. This is typically done in a rotary dryer machine, which uses hot air to evaporate the moisture from the pellets. The dryer is equipped with a rotating drum that tumbles the pellets as they dry, ensuring that they are evenly dried throughout. Drying is an important step in the pelletizing process, as it helps to improve the strength and durability of the pellets.

In conclusion, making bentonite pellets requires a variety of specialized equipment, including pelletizing discs, extruders, roller presses, mixers, and drying equipment. Each piece of equipment plays a critical role in the pelletizing process, ensuring that the bentonite is properly processed and formed into high-quality pellets that are suitable for their intended application.

What compost turner can process cow dung

Introduction to Composting with Cow Dung

Composting is a biological process that involves the breakdown of organic materials by microorganisms in the presence of oxygen. Cow dung, an abundant byproduct of dairy farming, is rich in nutrients and can be effectively converted into compost, which is an excellent soil amendment for improving soil structure, water retention, and fertility. To accelerate and optimize the composting process, a compost turner is often used.

The Role of Compost Turners in Cow Dung Composting

Understanding Compost Turners

Compost turners are mechanical devices designed to improve the aeration and mixing of compost piles. They come in various forms, including wheel type compost turners, windrow turners, and groove type composter machines. By turning and mixing the compost pile, these machines enhance microbial activity, which speeds up the composting process. If you want to  have a less occupation, we recommend you with SX organic fertilizer fermenter.

compost production machine

Advantages of Using Compost Turners

Using compost turners offers several benefits:

  • Enhanced Aeration: Turners introduce oxygen into the pile, which is crucial for aerobic decomposition.
  • Uniform Mixing: They help distribute moisture, temperature, and microbes throughout the compost pile, ensuring a uniform decomposition process.
  • Reduced Composting Time: By optimizing the conditions for microbial activity, compost turners can significantly shorten the composting duration.
  • Improved Compost Quality: The thorough mixing and aeration result in a more stable and homogenous end product.

The Composting Process of Cow Dung with a Compost Turner

Initial Preparation

Before using a compost turner, the cow dung should be gathered and formed into long rows known as windrows. The windrows are shaped to allow the compost turner to pass over them, turning and aerating the material.

Frequent Turning

The compost turner is typically run over the windrows every few days. Each pass of the turner not only aerates the pile but also breaks up clumps of material and integrates any added bulking agents, such as straw or wood chips, which help to create air pockets and absorb excess moisture.

Monitoring and Controlling Parameters

Throughout the composting process, parameters such as temperature, moisture, and oxygen levels must be monitored and maintained within optimal ranges. The compost turner helps manage these factors by turning the pile, which releases excess heat and reintroduces fresh oxygen.

End Product and Usage

Maturity and Harvesting

The compost is considered mature when it is dark brown, has an earthy smell, and its temperature stabilizes at ambient conditions. At this point, the compost turner is used for the final turning, which readies the compost for screening and harvesting.

Application of Composted Cow Dung

The resulting compost can be used in various agricultural settings:

  • As a soil conditioner to improve soil structure.
  • As a natural fertilizer to supply plants with essential nutrients.
  • As a medium for potting mixes or landscaping applications.

Conclusion

Compost turners play a crucial role in the efficient and effective composting of cow dung. By turning the material regularly and ensuring optimal conditions for decomposition, they help transform cow dung into valuable compost that can enhance soil health and fertility. The use of compost turners in cow dung management also contributes to sustainable agricultural practices by recycling waste products into beneficial resources for crop production. If you prepare to compost chicken waste, we can also offer the best solution for you.

How to make 17:17:17 npk fertilizer

Introduction to 17:17:17 NPK Fertilizer Production

The balanced 17:17:17 NPK fertilizer is a popular formula used in agriculture, providing equal parts nitrogen (N), phosphorus (P), and potassium (K) to plants. This multi-nutrient fertilizer is essential for comprehensive plant nutrition, promoting healthy growth, root development, and fruiting. The production of 17:17:17 NPK fertilizer is methodical and requires precise blending of these nutrients. Let’s explore the manufacturing process of this balanced fertilizer.

Understanding NPK and Its Importance

Before diving into production, it’s essential to understand why NPK ratios are important. Nitrogen is vital for leaf growth, phosphorus for roots and flowers, and potassium for overall plant health. The 17:17:17 ratio indicates that the fertilizer contains 17% of each nutrient, making it a balanced feed suitable for a wide range of plants at different growing stages.

Raw Material Procurement

The production of 17:17:17 NPK fertilizer starts with the procurement of raw materials. Urea or ammonium nitrate provides nitrogen, superphosphate or monoammonium phosphate supplies phosphorus, and potassium chloride or sulfate offers potassium. These materials are sourced in their purest forms to ensure the final product’s quality.

Batching and Mixing

Batching

Raw materials are carefully batched according to the desired 17:17:17 NPK ratio. Automated systems often handle the weighing to maintain accuracy and consistency. Precise measurements are crucial to achieving the correct nutrient balance in the final product.

Mixing

Once the raw materials are batched, they move to the mixing stage. Here, they are thoroughly blended to achieve a homogenous mix. High-speed mixers or blenders are used to ensure that each granule of fertilizer will contain the same proportion of nutrients.

Granulation Process

The homogeneous mixture is then sent to a granulator, where it will be processed into granules. There are several granulation methods, but the most common for NPK fertilizers include:

Drying, Cooling, and Screening

Drying

Granulated NPK is transferred to a dryer to reduce moisture content, which strengthens the granules and prepares them for storage and handling.

Cooling

Post-drying, the granules are cooled to room temperature to prevent caking and ensure stability.

Screening

The granules are then passed through screens to separate and remove any dust or fine particles. Properly sized granules are collected for the final product, while fines are recycled back into the production process.

Coating and Quality Control

To enhance their properties, the granules are often coated with a layer of a substance that prevents caking and improves flowability. After coating, the fertilizer undergoes rigorous quality control tests. These tests check for nutrient content, granule size and hardness, moisture levels, and overall quality to ensure it meets the 17:17:17 ratio and industry standards.

Packaging and Distribution

Once the fertilizer passes all quality checks, it is packaged in bags or bulk according to customer preferences. The packaged fertilizer is then distributed to agricultural suppliers or directly to farmers. Proper packaging is crucial to protect the product from moisture and other environmental factors during storage and transit.

Conclusion

Producing 17:17:17 NPK fertilizer is a precise and technical process that ensures farmers receive a high-quality product to support plant growth. From careful raw material selection to meticulous batching, mixing, granulation, and quality control, each step is vital in creating a balanced and effective fertilizer. With this multi-nutrient product, growers can provide their crops with the essential nutrients needed for a bountiful harvest.

17 17 17 NPK Fertilizer Production for Large Scale Capacity

NPK fertilizers, which consist of essential nutrients such as nitrogen (N), phosphorus (P), and potassium (K), play a pivotal role in modern agriculture by providing plants with the required nutrients for healthy growth and optimal yield. The balanced composition of NPK fertilizers addresses the specific nutritional needs of crops, contributing significantly to enhanced crop productivity. In this discourse, we delve into the intricate process of NPK fertilizer production, focusing on large-scale capacity production methods, their benefits, and their implications for sustainable agriculture.

NPK fertilizer materials

I. Nutrient Importance and Role in Plant Growth

The three primary nutrients found in NPK fertilizers – nitrogen, phosphorus, and potassium – each serve distinct functions in promoting plant growth and development. Nitrogen is vital for leaf and stem growth, promoting vibrant green foliage and overall plant vigor. Phosphorus is crucial for root development, flower and fruit formation, and facilitating energy transfer within the plant. Potassium aids in maintaining water balance, disease resistance, and improving overall plant resilience. The optimal balance of these nutrients is essential for robust crop health and yield.

II. Production Process of NPK Fertilizers

  • A. Ingredient Sourcing and Preparation
  • The production of NPK fertilizers begins with sourcing high-quality raw materials that contain the requisite nutrients. These materials often include ammonium nitrate, urea, superphosphate, and potassium chloride. Each raw material is carefully selected for its nutrient content and purity.
  • B. Blending and Mixing
  • Blending and mixing of the raw materials are critical steps in achieving the desired NPK ratios. Large-scale production facilities employ advanced equipment and technology to ensure accurate blending, homogenizing the nutrients and creating a consistent mixture.
  • C. Granulation
  • Granulation is the process of converting the blended mixture into granules for ease of handling, transportation, and application. Granulation methods include drum pelletizer, pan granulation, and extrusion granulation. These techniques allow for the formation of uniform-sized granules with controlled nutrient release characteristics.
  • D. Coating and Finishing
  • Coating the granules with protective layers further enhances their nutrient release patterns, reducing the risk of nutrient leaching and optimizing nutrient uptake by plants. Coatings may contain polymers, sulfur, or other compounds designed to control release rates and ensure efficient nutrient utilization.

III. Benefits of 17 17 17 Large-Scale NPK Fertilizer Production

  • A. Enhanced Efficiency and Quality
  • Large-scale production facilities leverage economies of scale to produce 17 17 17 NPK fertilizers more efficiently and consistently. Advanced automation and quality control measures ensure accurate nutrient ratios and minimal impurities, resulting in high-quality fertilizers that maximize crop yields.
  • B. Meeting Global Agricultural Demands
  • The demand for food is ever-increasing due to population growth and changing dietary preferences. Large-scale NPK fertilizer production plays a pivotal role in meeting these demands by providing farmers with the necessary tools to enhance crop productivity and contribute to global food security.
  • C. Innovation and Research
  • Large-scale production facilities often invest in research and development to improve production techniques, optimize nutrient formulations, and develop environmentally friendly fertilizers. These efforts contribute to sustainable agricultural practices and minimize the ecological footprint of fertilizer production.

IV. Ensuring Sustainability in NPK Fertilizer Production

  • A. Nutrient Stewardship Sustainable
  • NPK fertilizer production involves promoting responsible nutrient management practices, including precision application and monitoring. This approach minimizes nutrient runoff and reduces the risk of water pollution, safeguarding aquatic ecosystems.
  • B. Resource Efficiency
  • Large-scale production facilities strive to minimize resource consumption, such as energy and water, through innovative process design and technology. Implementing energy-efficient equipment and recycling waste products contribute to a more sustainable production process.
  • C. Environmental Impact Mitigation Sustainable practices in NPK fertilizer production include minimizing greenhouse gas emissions, reducing the use of hazardous chemicals, and adopting circular economy principles to manage waste and byproducts.

Conclusion

In conclusion, large-scale 17 17 17 NPK fertilizer production is a vital component of modern agriculture, enabling farmers to achieve higher yields and contribute to global food security. The intricate process of ingredient sourcing, blending, granulation, and finishing ensures the creation of high-quality fertilizers that meet the specific nutritional needs of crops. By embracing sustainability measures, these production facilities play a crucial role in promoting responsible nutrient management, reducing environmental impacts, and advancing the cause of sustainable agriculture. As we move forward, the continued evolution of large-scale NPK fertilizer production holds the potential to drive agricultural innovation and address the challenges of a growing global population. If you are interested in it, we can also make 20 10 10 NPK Fertilizer for you.

How to Make Bentonite Granules?

Bentonite granules are versatile and widely used in various industries, including agriculture, environmental remediation, and even in the cosmetics sector. These granules are formed from bentonite clay, a naturally occurring material known for its exceptional absorbent and swelling properties. In this comprehensive guide, we will walk you through the step-by-step process of creating bentonite granules for your specific application.

bentonite pellets
bentonite pellets

Materials and Equipment

Before delving into the granulation process, gather all the necessary materials and equipment. You will need:

  1. Bentonite Clay: Obtain high-quality bentonite clay from a reliable supplier. The quality of the clay will significantly impact the effectiveness of the granules.
  2. Binder: Select an appropriate binder to help form and hold the granules together. Common binders include water, organic materials, or specialized binding agents.
  3. Granulation Equipment: Depending on your scale of production, you might need a granulator, pelletizer, or agglomeration equipment. These machines will help shape the bentonite mixture into uniform granules.
  4. Drying Equipment: To remove moisture from the granules, you’ll need a drying apparatus. This could be a rotary dryer, fluid bed dryer, or any other suitable drying equipment.
  5. Screening Equipment: A screening machine will be necessary to separate granules of the desired size from any oversize particles.

Step-by-Step Process

1. Preparation of Bentonite Mixture

  • Begin by accurately measuring the bentonite clay. The quantity will depend on the desired batch size and the specifications of your application.
  • If using a binder, determine the appropriate ratio of binder to bentonite clay. The binder will help agglomerate the clay particles during granulation.
  • Thoroughly mix the bentonite clay and the binder. This can be achieved through mechanical mixing or other suitable methods. The mixture should be homogeneous and have a consistent moisture content.

2. Granulation

  • Transfer the prepared bentonite mixture into the granulation equipment. The equipment’s design will determine the specific granulation process. It might involve high-shear mixing, extrusion, or other methods to form the mixture into granules.
  • As the mixture passes through the pan granulator, the rotating blades or other mechanisms will shape it into small granules. The size of the granules can be adjusted by controlling the equipment parameters.

3. Drying

  • Once the granules are formed, they will contain a certain level of moisture from the binder and the clay. Transfer the granules to the drying equipment.
  • Follow the manufacturer’s guidelines for the drying process. Proper drying is crucial to ensure the granules are stable, free-flowing, and have a long shelf life.

4. Screening and Quality Control

  • After drying, use the screening equipment to separate the granules into the desired size range. Oversize and undersize granules can be recycled back into the granulation process.
  • Perform quality control checks on the final granules. This might include testing for granule strength, size distribution, moisture content, and other relevant parameters.

5. Packaging and Storage

  • Once the granules pass quality control, package them in suitable containers. Proper packaging will prevent moisture absorption and maintain granule integrity.
  • Store the packaged bentonite granules in a dry and controlled environment. Follow recommended storage conditions to ensure the granules retain their efficacy.

In conclusion, creating bentonite granules involves a series of well-defined steps, from preparing the clay mixture to packaging the final product. The quality of the raw materials, the granulation process, and the drying phase all play crucial roles in producing effective bentonite granules tailored to your application’s needs. Always adhere to best practices and quality control measures to ensure consistent and reliable results.

How to Manufacturing 17:17:17 NPK Fertilizer?

NPK fertilizers are essential for modern agriculture, providing crops with the necessary nutrients they need to grow and thrive. NPK stands for Nitrogen (N), Phosphorus (P), and Potassium (K), representing the three primary nutrients required for plant development. The 17:17:17 NPK fertilizer formulation, also known as balanced fertilizer, contains equal percentages of these three elements. This balanced blend is ideal for promoting overall plant health, supporting root development, and enhancing fruit and flower production.

17:17:17 npk fertilizer production

Subtitle 2: Sourcing the Raw Materials

To begin manufacturing 17:17:17 NPK fertilizer, the first step is to source the raw materials – nitrogen, phosphorus, and potassium compounds. These can be obtained from various sources, including:

  1. Nitrogen Sources: Common nitrogen sources include ammonium nitrate, urea, and ammonium sulfate. These materials are rich in nitrogen and contribute to strong vegetative growth.
  2. Phosphorus Sources: Phosphorus is typically derived from phosphate rock or superphosphate. It is essential for root development, flower formation, and overall plant energy transfer.
  3. Potassium Sources: Potassium can be obtained from potassium chloride or potassium sulfate. It plays a crucial role in enhancing fruit quality, disease resistance, and water uptake efficiency.

Subtitle 3: Mixing and Blending

Once the raw materials are acquired, the next step is to mix and blend them to achieve the desired 17:17:17 NPK ratio. Precise measurements and quality control are crucial at this stage to ensure a balanced fertilizer product. Industrial mixers or blending machines are commonly used to achieve an even distribution of nutrients throughout the final product.

Subtitle 4: Granulation Process

After obtaining a well-mixed NPK blend, the next stage involves granulation. Granulation improves the fertilizer’s handling properties, reduces dust, and enhances nutrient release control. Various granulation techniques can be employed, including:

  1. Drum Granulation: In this method, the blended fertilizer is agitated in a rotating drum, and as the material tumbles, it forms granules of consistent size.
  2. Compaction Granulation: This process involves compressing the blended material between rollers to create dense, granular particles.

Subtitle 5: Drying and Cooling

Following granulation, the newly formed fertilizer granules undergo a drying process to reduce moisture content. Lower moisture levels prevent caking and ensure the product’s stability during storage and transportation. After drying, the granules are cooled to room temperature to avoid any potential reabsorption of moisture.

Subtitle 6: Screening and Quality Assurance

Before packaging, the granules are screened to remove any oversized or undersized particles, ensuring a uniform product size. Additionally, quality assurance checks are conducted to analyze the final fertilizer’s nutrient content, ensuring it adheres to the 17:17:17 NPK formulation.

Subtitle 7: Packaging and Storage

The final step is the packaging of the 17:17:17 NPK fertilizer into bags or other suitable containers. Properly sealed packaging protects the product from external contaminants and moisture. The bags are labeled with essential information, such as nutrient composition, usage instructions, and safety guidelines.

It is crucial to store the packaged fertilizer in a dry, cool, and well-ventilated area to maintain its quality and effectiveness.

Subtitle 8: Application and Benefits

Once the 17:17:17 NPK fertilizer is ready for use, it can be applied to various crops, including fruits, vegetables, cereals, and ornamental plants. The balanced nutrient composition promotes healthy plant growth, improves yield and quality, and enhances overall crop resistance to diseases and environmental stressors. Click https://www.fertilizerproductionproject.com/how-to-make-fertilizer-npk-171717/ to get more information.

In conclusion, manufacturing 17:17:17 NPK fertilizer requires careful sourcing of raw materials, precise mixing and blending, granulation, and thorough quality assurance. This balanced fertilizer formulation provides crops with the optimal combination of essential nutrients, supporting sustainable and efficient agriculture for a growing global population.

5Things Need to Focus on Making Zeolite Granules

Zeolite granules are a highly valuable and versatile material used in various industries, including agriculture, water purification, and gas separation. These granules are composed of zeolites, a group of naturally occurring or synthetic hydrated aluminosilicate minerals with a unique crystalline structure. To ensure the production of high-quality zeolite granules, there are five crucial aspects that need to be given utmost attention. In this passage, we will explore these key factors and understand their significance in the process of making zeolite granules.

1. Selection of Zeolite Type

The first and foremost step in the production of zeolite granules is the selection of the appropriate zeolite type. There are numerous zeolite varieties available, each possessing distinct properties and applications. For instance, clinoptilolite is commonly used in agricultural applications due to its exceptional cation exchange capacity and water retention properties. On the other hand, faujasite zeolites, such as zeolite Y, are often preferred for gas separation processes due to their high selectivity for specific molecules. Therefore, understanding the desired end-use of the zeolite granules is crucial in selecting the most suitable zeolite type.

2. Raw Material Quality

The quality of the raw materials used in the production of zeolite granules has a significant impact on the final product’s performance. High-purity raw materials with low levels of impurities must be utilized to ensure the desired physical and chemical characteristics of the zeolite granules. The presence of impurities can lead to undesired reactions during the granulation process, affecting the granules’ porosity, surface area, and adsorption capacity. Rigorous testing and quality control measures should be implemented to ensure that only the finest raw materials are employed.

3. Granulation Process Optimization

The granulation process is a critical stage in the production of zeolite granules, as it directly influences their size, shape, and mechanical strength. Various granulation techniques, such as spray drying, extrusion, and agglomeration, can be employed to create granules of different sizes and shapes. The process parameters, such as binder type and concentration, drying temperature, and granulation time, need to be carefully optimized to obtain granules with the desired characteristics. Additionally, the agglomeration step should be carried out to ensure uniformity in size and avoid the formation of fines that may reduce the granules’ performance.

roller granulation machine


4. Ion Exchange and Activation

Before the zeolite granules are ready for commercial use, they often undergo an ion exchange and activation step. During the ion exchange process, cations present in the zeolite structure are exchanged with desirable cations, further enhancing their adsorption capabilities. For instance, sodium ions in the zeolite structure can be exchanged with calcium or potassium ions, depending on the intended application. Subsequently, the activated zeolite granules are subjected to a controlled thermal treatment to stabilize their structure and optimize their performance. Proper monitoring and control of these processes are essential to achieve the desired level of ion exchange and activation.

5. Quality Control and Testing

Throughout the entire production process, stringent quality control measures must be implemented to ensure the consistency and performance of the zeolite granules. Various analytical techniques, such as X-ray diffraction (XRD), scanning electron microscopy (SEM), and nitrogen adsorption analysis, can be used to assess the granules’ crystal structure, morphology, and surface area, respectively. Additionally, practical performance tests, including adsorption capacity and selectivity assessments, should be conducted to validate the granules’ suitability for their intended applications. Any deviations from the specified quality standards should be identified and rectified promptly.

Conclusion

Producing high-quality zeolite granules is a complex and multi-faceted process that demands careful attention to several critical aspects. From selecting the appropriate zeolite type to conducting rigorous quality control tests, each stage is vital in determining the granules’ performance and suitability for specific applications. By focusing on these five key areas, manufacturers can ensure the production of zeolite granules that meet the industry’s stringent requirements and contribute to advancements in agriculture, water purification, gas separation, and other vital sectors.

How to Compost Chicken Manure Quickly?

Composting chicken manure is an excellent way to transform this nutrient-rich waste into a valuable resource for your garden. Not only does it help reduce waste, but it also produces high-quality compost that improves soil fertility and promotes healthy plant growth. In this guide, we will explore effective techniques to compost chicken manure quickly.

process of dispose of material in the in-vessel composter

Subtitle 2: Collecting and Preparing Chicken Manure

To begin, gather fresh chicken manure from your coop or poultry house. It is crucial to avoid collecting manure mixed with bedding material, as this can slow down the composting process. Bedding such as straw, sawdust, or wood shavings should be separated and used as a carbon-rich ingredient in the compost pile.

Subtitle 3: Balancing the Carbon-to-Nitrogen Ratio

Achieving the correct carbon-to-nitrogen (C:N) ratio is vital for efficient composting. Chicken manure is a high-nitrogen material, so it needs to be balanced with carbon-rich materials. Add shredded leaves, straw, dry grass clippings, or shredded newspaper to the manure pile to provide the necessary carbon. Aim for a C:N ratio of approximately 25 to 30 parts carbon to 1 part nitrogen.

Subtitle 4: Moisture Management

Proper moisture levels are essential for the composting process. Chicken manure should be moist, similar to a wrung-out sponge. If it’s too dry, add water during the composting process to maintain the moisture balance. Conversely, if it’s too wet, mix in dry materials such as straw or wood chips to improve aeration and prevent excessive moisture.

Subtitle 5: Turning and Aerating the Pile

Regularly turning and aerating the compost pile is crucial for fast decomposition. Use a pitchfork or shovel to mix the materials thoroughly, ensuring oxygen reaches all parts of the pile. Turning the pile every two weeks helps to speed up the breakdown of the chicken manure and accelerates the composting process.

crawler type compost machine for chicken manure

Subtitle 6: Temperature Monitoring

Monitoring the temperature of the compost pile is essential. Chicken manure composting generates heat as microorganisms break down organic matter. Aim for a temperature range of 130°F to 150°F (54°C to 65°C) to promote optimal decomposition. If the pile becomes too hot, above 160°F (71°C), turn it to prevent excessive heat buildup.

Subtitle 7: Compost Maturity and Curing

After three to six months, the composted chicken manure should be dark brown, crumbly, and earthy-smelling. At this stage, it is mature and ready to use in your garden. To ensure complete decomposition and remove any remaining pathogens, let the compost cure for an additional month before applying it to plants.

Subtitle 8: Application and Benefits

When the composted chicken manure is fully cured, apply it to your garden beds, vegetable patches, or potted plants. This nutrient-rich compost improves soil structure, enhances water retention, and provides essential nutrients to your plants. Enjoy the benefits of healthier plants and higher yields, all while reducing waste and minimizing environmental impact.

Subtitle 9: Safety Considerations

While composting chicken manure is a valuable practice, it is essential to handle it safely. Always wear gloves when working with manure and wash your hands thoroughly afterward. Additionally, avoid using fresh chicken manure directly on edible crops, as it may contain harmful pathogens. Composting ensures that these pathogens are broken down during the process, making the composted material safe for use.

Subtitle 10: Conclusion

Composting chicken manure quickly can be achieved by collecting fresh manure, balancing the C:N ratio, managing moisture levels, turning the pile regularly, monitoring temperature, and allowing the compost to mature. By following these steps, you’ll transform chicken manure into a nutrient-rich compost that enhances your garden’s health and productivity while minimizing waste. Start composting today and reap the benefits of sustainable gardening!

How to Make Organic Fertilizer in New Type Stirring Granulator?

Organic fertilizers are an excellent way to enrich the soil and promote healthy plant growth while minimizing the use of harmful chemicals. One effective method of producing organic fertilizer is by utilizing a new type stirring granulator. This innovative equipment combines the benefits of traditional composting methods with modern technology to create high-quality organic fertilizer. In this article, we will walk you through the process of making organic fertilizer using a new type stirring granulator, highlighting the key steps and providing useful tips along the way.

Step 1: Source Organic Materials

To start making organic fertilizer, you’ll need to gather suitable organic materials. These can include animal manure, crop residues, and even leftover plant material from your garden. Make sure to select organic materials that are free from pesticides or other chemical contaminants, as these can affect the quality of the fertilizer. It’s also essential to maintain a balance of carbon-rich (brown) and nitrogen-rich (green) materials for optimal composting.

Step 2: Shredding and Mixing

Once you have collected your organic materials, it’s a good idea to shred or chop them into smaller pieces. This helps speed up the decomposition process by increasing the surface area available for microbial activity. After shredding, thoroughly mix the materials to ensure a homogeneous blend of carbon and nitrogen sources. This step is crucial for achieving a balanced nutrient profile in the final fertilizer.

Step 3: Pre-composting

Pre-composting is an optional but beneficial step that can enhance the decomposition process and accelerate the production of organic fertilizer. To pre-compost, create a compost pile or use a compost bin and place the mixed organic materials inside. It’s important to turn the pile regularly to promote aeration and ensure even decomposition. The duration of pre-composting can vary depending on the materials used and environmental conditions but typically ranges from a few weeks to several months.

Step 4: Introduce the Stirring Granulator

Once the pre-composting phase is complete, it’s time to introduce the new type stirring granulator into the process. This equipment is specifically designed to convert pre-composted organic materials into high-quality organic fertilizer pellets. The stirring granulator features a rotating drum that incorporates a stirring function, creating optimal conditions for the organic materials to be transformed into granules.

Step 5: Adjusting Moisture and Temperature

To ensure successful granulation, it is crucial to maintain proper moisture and temperature levels within the stirring granulator. The ideal moisture content typically falls between 30% and 35%. Adjust the moisture level as needed by adding water or dry organic matter to the mixture. Additionally, monitor the temperature inside the granulator, aiming for a range of 50 to 70 degrees Celsius (122 to 158 degrees Fahrenheit). This temperature range promotes the activity of beneficial microorganisms and facilitates the breakdown of organic matter.

Step 6: Granulation Process

With the organic materials properly adjusted for moisture and temperature, it’s time to initiate the new type stirring granulation process. Start the stirring granulator and gradually feed the pre-composted organic mixture into the drum. The rotating action of the granulator causes the materials to be evenly distributed, undergo compaction, and form into granules. The size of the granules can be adjusted by modifying the rotation speed and inclination angle of the granulator.

new typr organic fertilizer granulator

Step 7: Drying and Cooling

Once the granulation process is complete, the newly formed organic fertilizer pellets need to undergo drying and cooling. This step helps remove excess moisture from the granules, preventing spoilage and improving their storage stability. Various drying methods can be employed, such as natural air drying or using specialized drying equipment. After drying, allow the pellets to cool before proceeding to the next step.

Step 8: Sieving and Packaging

To obtain uniform-sized organic fertilizer pellets, it’s recommended to sieve them after drying and cooling. This process ensures that any oversized or undersized particles are removed, leaving only the desired size range for packaging. Once sieved, the organic fertilizer pellets are ready for packaging and storage. Use suitable containers or bags that provide protection against moisture and maintain the product’s quality.

Conclusion:

Producing organic fertilizer using a new type stirring granulator offers a highly efficient and effective method for converting organic materials into valuable nutrients for plants. By following the steps outlined above, you can create high-quality organic fertilizer that enriches the soil, promotes plant growth, and reduces the reliance on chemical fertilizers. Embracing organic farming practices not only benefits the environment but also contributes to the overall health and sustainability of our gardens and agricultural systems.

How to Make Limestone Pellets in Double Roller Granulator?

Introduction: Understanding Limestone Pellets

Limestone pellets are a popular form of limestone used in various industries, such as agriculture, construction, and environmental applications. These pellets are created by compressing powdered limestone into compacted pellets that are easier to handle and transport. The double roller granulator is a common machine used in the pelletizing process. In this guide, we will take you through the step-by-step process of making limestone pellets using a double roller granulator.

limestone granules
limestone granules

Step 1: Prepare the Raw Materials

To begin the pellet-making process, you need to gather the necessary raw materials. The primary ingredient is powdered limestone, which should have a consistent particle size and be free of impurities. It’s important to ensure that the limestone powder meets the required specifications for pelletizing.

Step 2: Adjust the Moisture Content

The moisture content of the limestone powder plays a crucial role in the pelletizing process. It affects the pellet formation, strength, and overall quality. Ideally, the moisture content should be around 8-12%. If the limestone powder is too dry, you can add water to achieve the desired moisture level. Conversely, if it is too wet, you can use a drying process to reduce the moisture content.

Step 3: Set Up the Double Roller Granulator

The double roller granulator consists of two parallel rolls that rotate in opposite directions. These rolls exert pressure on the limestone powder, shaping it into pellets. Before you start the granulation process, you need to set up the double roller granulator. Adjust the distance between the two rolls based on the desired pellet size. The speed of the rolls can also be adjusted according to specific requirements.

Step 4: Feed the Limestone Powder

Once the double roller granulator is properly set up, you can begin feeding the limestone powder into the machine. The powder is evenly distributed on the rolls, and as they rotate, it is compacted and shaped into pellets. The pressure exerted by the rolls ensures the formation of well-formed and uniform pellets.

Step 5: Adjust the Pressure and Roll Gap

During the pelletizing process, it’s important to monitor the pressure exerted by the rolls and the gap between them. Adjusting the pressure and roll gap can help control the size, density, and hardness of the limestone pellets. Higher pressure and smaller roll gap result in denser and harder pellets, while lower pressure and larger roll gap produce lighter and softer pellets.

Step 6: Collect and Screen the Pellets

As the pellets are formed, they are discharged from the double roller granulator. Collect the pellets and transfer them to a screening machine. The screening process helps remove any oversized or undersized pellets, ensuring a consistent size distribution. This step is crucial for obtaining high-quality limestone pellets with uniform properties.

Step 7: Cure the Pellets

Curing the pellets for a specific period allows them to harden and stabilize, making them suitable for storage and transportation.

Step 8: Packaging and Storage

Once the limestone pellets are properly dried and cured, they are ready for packaging and storage. Use appropriate packaging materials to ensure the pellets remain intact during handling and transport. Store the packaged pellets in a dry and controlled environment to maintain their quality and prevent moisture absorption.

Conclusion: Producing High-Quality Limestone Pellets

By following these steps, you can produce high-quality limestone pellets using a double roller granulator. Remember to start with suitable limestone powder, adjust the moisture content, and set up the granulator correctly. Monitoring and adjusting the pressure and roll gap during the granulation process is essential for obtaining pellets with the desired characteristics. Finally, screen, dry, cure, package, and store the pellets appropriately to ensure their long-term usability. With proper attention to detail and adherence to the process, you can successfully create limestone pellets that meet the required specifications for your specific applications.

How to Use Packaging Machine to Make Fertilizer?

In the world of modern agriculture and industrial production, packaging plays a vital role in ensuring the efficiency and convenience of fertilizer distribution. Packaging machines are designed to automate the process of filling and sealing fertilizer products into bags or containers. This article provides a comprehensive guide on how to effectively use a packaging machine to make fertilizer, outlining the steps involved and highlighting key considerations.

Selecting the Right Packaging Machine:

Before diving into the process, it is crucial to select the appropriate packaging machine for your fertilizer production needs. Factors such as the type of fertilizer, desired packaging format (bags, boxes, or containers), production capacity, and level of automation required should be taken into account. Consult with packaging machine suppliers or experts to identify the most suitable equipment for your specific requirements.

Preparing the Packaging Material:

Once the packaging machine is selected, the first step is to prepare the packaging material. This includes ensuring an adequate supply of bags or containers that meet the necessary specifications in terms of size, material quality, and strength. Additionally, labels or tags for product identification and branding should be readily available.

Calibrating the Machine:

Before starting the packaging process, it is essential to calibrate the packaging machine to ensure accurate measurements and optimal performance. This involves adjusting settings such as bag length, filling weight, and sealing temperature according to the fertilizer type and packaging material.

Loading the Fertilizer:

With the packaging machine calibrated, the next step is to load the fertilizer into the machine’s hopper or feeding system. The fertilizer can be supplied from a storage silo, conveyor belt, or manual feeding mechanism, depending on the setup of the production line. It is crucial to maintain a consistent and controlled flow of fertilizer to ensure accurate filling and prevent clogging or spillage.

Filling and Weighing:

Once the fertilizer is loaded, the packaging machine employs various mechanisms to accurately fill the packaging material with the desired amount of fertilizer. Advanced packaging machines utilize weighing systems that ensure precise measurements, while others may use volumetric or auger-based filling mechanisms. The weight or volume of each package can be adjusted based on the specific fertilizer formulation and packaging requirements.

Sealing and Labeling:

Once the packaging material is filled with fertilizer, the packaging machine proceeds to seal the bags or containers. This step typically involves heat sealing, where the packaging material is fused together using controlled heat. The sealing process ensures product integrity, prevents leakage or contamination, and prolongs shelf life. Simultaneously, the packaging machine can be programmed to apply labels, barcodes, or other identifying information to each package, facilitating product tracking and consumer information.

Quality Control and Inspection:

Throughout the packaging process, it is crucial to implement quality control measures to ensure the accuracy and consistency of the packaged fertilizer. This includes monitoring the weight or volume of each package, checking for proper sealing and labeling, and conducting periodic inspections for any defects or inconsistencies. Any issues should be promptly addressed to maintain product quality and compliance with industry standards.

Packaging Machine Maintenance:

To ensure the longevity and efficiency of the bagging machine, regular maintenance is essential. This includes cleaning the machine, inspecting and replacing worn-out parts, lubricating moving components, and conducting routine performance checks. Adhering to the manufacturer’s guidelines for maintenance and servicing will help prevent breakdowns and optimize the machine’s productivity.

Conclusion:

Using a packaging machine to make fertilizer offers significant advantages in terms of efficiency, accuracy, and product presentation. By following the steps outlined above, and considering factors such as machine selection, calibration, filling and sealing, quality control, and maintenance, farmers and fertilizer producers can streamline their operations and deliver high-quality products to the market. For details you can visit https://www.fertilizerproductionproject.com/manure-bagging-for-sale/.

Goat Manure Disc Granulator to Make Small Scale Fertilizer

In the realm of sustainable agriculture, the utilization of organic fertilizers has gained significant attention due to its numerous benefits. Goat manure, with its rich nutrient composition, is an excellent source of organic matter that can be transformed into high-quality fertilizer. One effective method to process goat manure into fertilizer is through the use of a disc granulator. This article explores the process of utilizing a disc granulator to produce small-scale fertilizer from goat manure, highlighting its advantages and steps involved.

Benefits of Goat Manure Fertilizer:

Goat manure possesses several key advantages that make it an ideal choice for fertilizer production. Firstly, it is rich in essential nutrients such as nitrogen, phosphorus, and potassium (NPK), along with other micronutrients. These nutrients are crucial for plant growth and development, ensuring healthy yields. Secondly, goat manure contains organic matter that improves soil structure, enhances moisture retention, and promotes microbial activity, thus fostering a fertile and productive soil ecosystem. Lastly, utilizing goat manure as fertilizer is an eco-friendly approach, reducing waste accumulation and providing a sustainable alternative to chemical-based fertilizers.

Disc Granulator: An Overview:

A disc granulator is a mechanical device used to convert raw materials into uniform granules. It comprises a rotating disc, an inclined angle adjustment mechanism, a scraper, and a granulation plate. The disc rotates at high speed, causing the raw material, in this case, goat manure, to adhere to the granulation plate. The combination of centrifugal force and friction leads to the formation of spherical granules. These granules can then be dried, cooled, and packaged as organic fertilizer.

Steps in Goat Manure Disc Granulation:

  1. Pre-processing: Prior to granulation, it is essential to pre-process the goat manure. This involves removing any foreign materials such as rocks, twigs, or plastic. Additionally, the manure can be composted or aged to enhance its nutrient content and reduce pathogens.
  2. Adjusting the angle: The angle of the disc granulation needs to be adjusted appropriately to achieve the desired granule size. A steeper angle will result in smaller granules, while a more shallow angle will yield larger granules. Experimentation and observation can help determine the optimal angle for a specific fertilizer requirement.
  3. Feeding the goat manure: The pre-processed goat manure is then evenly distributed onto the rotating disc of the granulator. Care should be taken to avoid overloading the disc, as this can affect the granulation process.
  4. Granulation: As the disc rotates, the goat manure adheres to the granulation plate. The combination of centrifugal force and friction causes the material to form small granules. The scraper positioned above the disc helps to control the thickness of the granules and prevent blockages.
  5. Drying and cooling: After the granulation process, the newly formed granules need to be dried to reduce moisture content and prevent microbial growth. This can be achieved through natural drying methods or with the help of a specialized drying system. Subsequently, the granules are cooled to ambient temperature to ensure stability and prevent clumping.
  6. Screening and packaging: The dried and cooled granules are then screened to remove any oversized or undersized particles, ensuring uniformity in size. The screened granules are ready for packaging, either in bags or other suitable containers, for storage or distribution.

Conclusion:

Utilizing a disc granulator to convert goat manure into small-scale fertilizer offers several benefits in terms of sustainability, soil health, and plant nutrition. The process, involving pre-processing, adjusting the angle, feeding the manure, granulation, drying and cooling, and finally screening and packaging, enables the production of high-quality organic fertilizer. By embracing this eco-friendly approach, farmers and gardeners can enhance their agricultural practices while promoting a greener and healthier environment.

How to Use Granulate Dryer to Dry Finished Fertilizer?

Granulate dryer is an essential piece of equipment used in the production of finished fertilizer. Its primary function is to remove excess moisture from granulated fertilizer particles, ensuring that the final product meets the desired quality standards. By reducing the moisture content, the granulate dryer enhances the shelf life of the fertilizer, prevents clumping, and facilitates easier handling and storage.

Subtitle: Preparing the Granulate Dryer

Before using the granulate dryer, it is crucial to ensure that the equipment is in proper working condition and ready for operation. Here are the steps to prepare the dryer:

  1. Inspection: Thoroughly inspect the granulate dryer for any signs of damage, wear, or malfunction. Check the electrical connections, fans, heating elements, and exhaust systems for any issues. Address any problems or concerns before proceeding.
  2. Cleaning: Clean the interior of the dryer to remove any residue or debris from previous operations. This step helps maintain hygiene and prevents contamination of the finished fertilizer.
  3. Safety Measures: Familiarize yourself with the safety guidelines provided by the manufacturer. Ensure that all safety features, such as emergency stop buttons and safety guards, are in place and functioning correctly. Wear appropriate personal protective equipment (PPE) during operation.

Subtitle: Operating the Granulate Dryer

Once the granulate dryer is prepared, follow these steps to effectively dry the finished fertilizer:

  1. Load the Dryer: Carefully load the granulated fertilizer into the dryer. Ensure an even distribution to facilitate uniform drying. Avoid overloading the dryer, as it can hinder the drying process and lead to uneven moisture content.
  2. Set the Parameters: Adjust the temperature and drying time according to the specifications of the fertilizer being processed. The temperature should be set within the recommended range to avoid damaging the fertilizer particles. The drying time will depend on factors such as the initial moisture content and the desired final moisture level.
  3. Start the Dryer: Once the parameters are set, start the granulate dryer and allow it to run for the designated drying time. Monitor the process regularly to ensure that the temperature and airflow remain stable. Adjust as necessary to maintain optimal drying conditions.
  4. Monitor Moisture Levels: Periodically test the moisture content of the granulated fertilizer during the drying process. Use a moisture meter or other appropriate measurement tools to assess the progress. Continue drying until the desired moisture level is achieved.

Subtitle: Post-Drying Procedures

After completing the drying process, there are a few essential post-drying procedures to follow:

  1. Cooling: Once the drying process is finished, allow the granulated fertilizer to cool down gradually before handling or packaging. This step helps prevent condensation and moisture absorption, ensuring the effectiveness of the drying process.
  2. Quality Control: Conduct a thorough inspection of the dried fertilizer to ensure that it meets the required quality standards. Check for clumps, uniformity, and overall appearance. If any issues are detected, take appropriate measures to address them.
  3. Packaging and Storage: Once the dried fertilizer passes the quality control inspection, proceed with packaging and storage. Use suitable packaging materials that maintain the quality and integrity of the fertilizer. Store the packaged fertilizer in a cool, dry place away from direct sunlight and moisture to preserve its efficacy.

Subtitle: Maintenance and Safety Considerations

To ensure the granulate dryer’s continued performance and safety, it is crucial to follow these maintenance guidelines:

  1. Regular Cleaning: Clean the granulate dryer after each use to remove any residual fertilizer particles. This prevents contamination and maintains optimal drying conditions.
  2. Lubrication: Regularly lubricate the moving parts of the dryer as per the manufacturer’s instructions. This helps prevent wear and tear and ensures smooth operation.
  3. Inspections: Schedule routine inspections of the granulate dryer to identify and address any potential issues before they escalate. Pay attention to electrical connections, heating elements, fans, and safety features.
  4. Training and Safety: Provide proper training to personnel operating the granulate dryer. Emphasize the importance of adhering to safety guidelines and using appropriate PPE to prevent accidents and injuries.

In conclusion, utilizing a granulate dryer to dry finished fertilizer is a crucial step in the production process. By following the proper procedures outlined in this guide, you can ensure efficient drying, maintain quality standards, and enhance the shelf life of the fertilizer. Remember to prioritize safety and regular maintenance to optimize the performance and longevity of the granulate dryer.

How to Use Rotary Drum Granulation Machine to Make Fertilizer?

Fertilizers play a vital role in agricultural practices, providing essential nutrients to plants and promoting healthy growth. Rotary drum granulation machines have revolutionized the fertilizer manufacturing process, offering a highly efficient and effective method of producing granular fertilizers. This innovative equipment utilizes a rotating drum to agglomerate and granulate raw materials, resulting in high-quality fertilizer pellets. In this guide, we will explore the step-by-step process of using a rotary drum granulation machine to make fertilizer, accompanied by helpful tips and insights.

Step 1: Preparation of Raw Materials

Before operating the rotary drum granulation machine, it is crucial to prepare the raw materials properly. This involves selecting the appropriate ingredients based on the desired fertilizer composition and ensuring they are in the correct proportions. Common raw materials used in fertilizer production include nitrogen sources (such as urea or ammonium nitrate), phosphorus sources (such as single superphosphate or diammonium phosphate), and potassium sources (such as potassium chloride or potassium sulfate). Additionally, organic materials like compost or animal manure can be incorporated to enhance the nutrient content of the fertilizer.

Step 2: Crushing and Mixing

Once the raw materials are selected, they need to be crushed and thoroughly mixed to create a homogeneous blend. This process is essential to ensure uniformity in the final fertilizer product. Depending on the specific requirements, a crusher and a mixer can be employed for this purpose. The crusher reduces the particle size of the raw materials, making them easier to handle and facilitating the subsequent mixing process. The mixer combines the crushed materials, ensuring an even distribution of nutrients throughout the fertilizer blend.

Step 3: Feeding the Rotary Drum Granulation Machine

After achieving a well-mixed fertilizer blend, it is time to feed the material into the rotary drum granulation machine. The machine’s feeding system should be adjusted to control the rate at which the raw materials enter the drum. It is crucial to maintain a consistent feed rate to achieve uniform granulation and prevent overloading the machine. Care should be taken to prevent any foreign objects or oversized particles from entering the drum, as they can affect the granulation process and damage the equipment.

Step 4: Granulation Process

Once the raw materials enter the rotary drum granulation machine, the granulation process begins. The drum rotates, and the material tumbles and rolls within it. As the drum rotates, a liquid binder or water is sprayed onto the tumbling material. The binder acts as an adhesive, causing the particles to adhere to one another and form granules. The combination of the rotating drum and the liquid binder promotes the agglomeration and granulation of the raw materials, resulting in uniformly sized fertilizer pellets.

rotary drum granulation machine

Step 5: Drying and Cooling

After the granulation process is complete, the newly formed fertilizer pellets may contain excess moisture. To ensure the stability and longevity of the pellets, it is necessary to dry them. This can be accomplished by passing the granules through a dryer, which utilizes hot air to remove the moisture. The drying temperature and duration should be carefully controlled to prevent the pellets from becoming too brittle or losing their nutrient content. Once dried, the fertilizer pellets are then cooled to room temperature using a cooling system, which enhances their strength and hardness.

Step 6: Screening and Packaging

The final step in the process is to screen the fertilizer pellets to remove any oversized or undersized particles, ensuring a consistent size distribution. A vibrating screen or a rotary screener can be used for this purpose. Once the pellets are properly screened, they are ready for packaging. Depending on the specific requirements, the pellets can be bagged in different sizes or loaded into bulk containers for transportation and storage.

Conclusion

The rotary drum granulation machine is a valuable tool in the production of high-quality fertilizers. By following the step-by-step process outlined above, farmers and fertilizer manufacturers can utilize this equipment efficiently and effectively. Proper preparation of raw materials, crushing and mixing, controlled feeding, granulation, drying and cooling, and final screening and packaging are essential stages to ensure the production of uniform and nutrient-rich fertilizer pellets. With the rotary drum granulation machine, farmers can enhance crop productivity and contribute to sustainable agricultural practices. Inquiry us for details. https://www.fertilizerproductionproject.com/rotary-drum-granulation-machine/.

How to compost horse manure fast

Composting horse manure is an effective and environmentally friendly way to turn waste into nutrient-rich fertilizer for your garden or plants. By following a few key steps, you can accelerate the composting process and produce high-quality compost in a relatively short period. Here’s a guide on how to compost horse manure quickly.

Manure fertilizer after composting

Firstly, start by selecting a suitable composting area. Find a well-drained spot in your garden or yard that receives partial sunlight. This will help maintain the ideal temperature and moisture levels necessary for efficient decomposition.

Next, gather fresh horse manure and bedding material such as straw or sawdust. Ensure that the manure is free from contaminants such as pesticides or medications that may harm your plants. It’s best to avoid using manure from horses that have recently been treated with deworming medication.

Once you have the materials, create a compost pile or groove. Aim for a sizeable heap, as larger piles tend to generate heat more effectively. Layer the horse manure with the bedding material, alternating between the two. This will help create a balanced carbon-to-nitrogen ratio, essential for proper decomposition. Aim for a ratio of roughly 25 parts carbon (bedding) to 1 part nitrogen (manure).

well fermented compost by compost turner

To accelerate the composting process, ensure adequate moisture. Horse manure compost piles should be moist but not waterlogged. To maintain the ideal moisture levels, regularly monitor the pile and add water as needed. It should have the consistency of a damp sponge.

Turning the pile regularly is crucial for fast decomposition. Use a horse manure compost turner  to turn thoroughly every one to two weeks. Turning the pile helps incorporate oxygen, which aids the growth of beneficial bacteria and speeds up decomposition. Additionally, it helps distribute moisture evenly and prevents foul odors.

Maintaining the right temperature is vital for efficient composting. The internal temperature of the pile should ideally range between 130°F and 150°F (55°C to 65°C). If the pile becomes too hot, turn it more frequently or add extra bedding material to reduce the temperature. Conversely, if the temperature drops below 100°F (38°C), the decomposition process may slow down, so consider adding nitrogen-rich materials like grass clippings or vegetable scraps to boost microbial activity.

Regularly monitor the progress of your compost pile. As decomposition takes place, the pile will gradually shrink in size, and the materials will transform into dark, crumbly compost. This process typically takes three to six months, but by following the steps mentioned above, you can significantly reduce the composting time.

horse manure compost turner

Once the compost resembles rich, earthy soil, it’s ready to use. Before applying it to your garden or plants, let it cure for an additional two to four weeks. This curing period allows any remaining pathogens or weed seeds to break down further, ensuring a safe and beneficial product for your plants.

Composting horse manure fast requires attention to detail and regular maintenance, but the rewards are worth it. By transforming waste into nutrient-rich compost, you’ll not only improve your soil’s fertility but also contribute to a sustainable and eco-friendly gardening practice.

You can check our website for more about our products!

Horse Manure Disposal

How to Start An 17:17:17 NPK Fertilizer Production Line?

NPK (Nitrogen, Phosphorus, and Potassium) fertilizers play a crucial role in modern agriculture by providing essential nutrients to plants. An NPK fertilizer with a ratio of 17:17:17 is a balanced blend that ensures optimal growth and development of crops. If you’re interested in starting a 17:17:17 NPK fertilizer production line, this guide will walk you through the essential steps to get started.

  1. Conduct Market Research:

Before diving into the production process, it’s vital to conduct thorough market research. Understand the demand for NPK fertilizers in your target region. Identify potential customers such as farmers, agricultural cooperatives, and distributors. Analyze the competition and determine your unique selling points to stand out in the market.

  1. Obtain Necessary Licenses and Permits:

To operate a fertilizer production line, you’ll need to comply with local regulations and obtain the required licenses and permits. Contact your local agricultural department or regulatory authority to understand the specific requirements. Ensure that you meet all the safety and environmental standards to operate legally and responsibly.

  1. Acquire the Required Equipment:

Investing in the right equipment is crucial for a successful NPK fertilizer production line. The essential equipment includes a batching system, mixing machine, crusher, granulator, drying machine, cooling machine, screening machine, and packaging equipment. Consider the production capacity you aim to achieve and choose equipment accordingly.

  1. Source Raw Materials:

To produce 17:17:17 NPK fertilizer, you’ll need high-quality raw materials containing the right proportion of nitrogen, phosphorus, and potassium. The common sources include ammonium nitrate, urea, ammonium phosphate, potassium chloride, and potassium sulfate. Establish reliable supplier relationships to ensure a steady supply of raw materials for your production line.

  1. Mixing and Crushing:

The first step in the production process is mixing the raw materials to achieve the desired NPK ratio. Use the batching system to accurately measure and combine the ingredients in the correct proportions. After mixing, the materials may need to be crushed to ensure a consistent particle size and improve the efficiency of subsequent processes.

  1. Granulation:

Granulation is a critical step that converts the mixed fertilizer materials into granules for easier handling, storage, and application. The granulator machine plays a vital role in this process. It uses a combination of mechanical pressure and binding agents to form uniform granules. Adjust the granulator settings to achieve the desired size and shape of the granules.

  1. Drying and Cooling:

After granulation, the moisture content of the fertilizer is relatively high. Drying the granules is necessary to reduce moisture and increase their stability and shelf life. The drying machine utilizes heat and air circulation to remove moisture from the granules. Once dried, the granules are then cooled to ambient temperature using a cooling machine.

  1. Screening and Packaging:

The dried and cooled granules go through a screening process to separate any oversized or undersized particles. The screening machine ensures that only granules of the desired size make it through. After screening, the final product is ready for packaging. Use automatic packaging equipment to weigh and bag the fertilizer in the desired quantities, ensuring proper labeling and branding.

npk fertilizer making plant
  1. Marketing and Distribution:

With your 17:17:17 NPK fertilizer production line up and running, it’s time to focus on marketing and distribution. Develop a comprehensive marketing strategy that highlights the benefits and features of your fertilizer. Explore both online and offline channels to reach potential customers. Build relationships with distributors and retailers to expand your market reach.

Conclusion:

Starting a 17:17:17 NPK fertilizer production line requires careful planning, market research, and adherence to regulations. By following the steps outlined in this guide, you can establish a successful production line that meets the demand for high-quality NPK fertilizers. Remember to prioritize quality control, environmental sustainability, and customer satisfaction throughout the process. With dedication and perseverance, your fertilizer production venture can contribute to the growth and productivity of the agricultural sector.

how long to compost sheep manure

Composting sheep manure is a great way to convert a potentially smelly and hazardous waste product into a valuable resource for your garden. However, one of the most common questions that gardeners have is how long it takes to compost sheep manure. The answer to this question depends on several factors, including the composting method used, the temperature, humidity, and the carbon-to-nitrogen ratio of the compost.

Manure fertilizer after composting

Sheep manure is high in nitrogen, which is essential for plant growth, but it can also be too hot for plants if it’s not properly composted. To avoid burning your plants with fresh manure, it’s essential to compost it first. Composting is a natural process that involves the breakdown of organic matter by microorganisms. The process is typically faster if you provide the right conditions for the microbes, such as air, water, and a balanced carbon-to-nitrogen ratio.

One of the most popular methods of composting sheep manure is the aerobic composting method. This method involves mixing the manure with other organic materials, such as straw, leaves, or sawdust, to create a balanced carbon-to-nitrogen ratio. The optimal ratio is about 30 parts carbon to 1 part nitrogen. This ratio provides enough carbon to absorb excess moisture and prevent the compost from becoming too wet and smelly, while the nitrogen feeds the microorganisms that break down the organic matter.

well fermented compost by compost turner

Once you have mixed the manure with other organic materials, it’s time to turn the compost pile regularly to provide oxygen to the microorganisms. Turning the pile also helps to distribute heat evenly, ensuring that all parts of the pile break down at the same rate. The ideal temperature for aerobic composting is between 130-140°F (55-60°C). At this temperature, the microbes are most active and can break down the organic matter quickly.

In general, it takes between 6 to 12 months to compost sheep manure using the aerobic composting method. The exact time will depend on several factors, such as the size of the pile, the moisture level, and the carbon-to-nitrogen ratio. However, you can speed up the composting process by using the sheep manure composting machine ensuring that the pile is moist but not too wet, providing plenty of oxygen, and maintaining the optimal temperature.

In conclusion, composting sheep manure is an excellent way to create a valuable resource for your garden. While the exact time it takes to compost sheep manure will depend on several factors, it typically takes between 6 to 12 months using the aerobic composting method and up to 18 months using the vermicomposting method. By following the tips and providing the right conditions, you can speed up the composting process and create a nutrient-rich fertilizer for your plants.

Check our website to know more about us and our ability! Get an ideal fertilizer making line for your fertilizer making plant!

Sheep Manure Compost

Chicken Manure Disc Pelletizer

The process of composting chicken manure is a great way to turn waste into a valuable resource for agriculture. However, to get the most out of this process, farmers need to have an efficient and effective way to transform the composted manure into a form that can be easily spread over fields. This is where a chicken manure disc pelletizer comes in.

What is a Chicken Manure Disc Pelletizer?

A chicken manure disc pelletizer is a machine that compresses and shapes composted chicken manure into small pellets. These pellets are an ideal form for spreading over fields as they can be easily distributed, and they provide a slow-release source of nutrients for crops. The disc pelletizer uses a rotating disc that has a series of blades attached to it. As the disc rotates, the blades push the composted chicken manure against a stationary plate. This plate shapes the composted manure into small pellets, which are then discharged from the machine.

Advantages of a Chicken Manure Disc Pelletizer

One of the main advantages of using a chicken manure disc pelletizer is that it creates a uniform product. The pellets are all the same size and shape, which means that they can be spread evenly over a field. This is important as it ensures that crops receive a consistent supply of nutrients. In addition, the pellets are easier to handle than raw composted chicken manure, which can be bulky and difficult to spread.

Another advantage of a chicken manure disc pelletizer is that it helps to reduce odor. Chicken manure can be quite pungent, and the composting process can exacerbate this. However, by compressing the composted chicken manure into pellets, the machine helps to reduce the surface area of the manure, which in turn reduces the amount of odor that is released.

How to Use a Chicken Manure Disc Pelletizer?

Using a chicken manure disc pelletizer is relatively straightforward. First, the composted chicken manure needs to be loaded into the machine. The disc should be set to rotate at the desired speed, and the blades should be adjusted to the appropriate angle. As the machine runs, the composted chicken manure will be pushed against the stationary plate, and small pellets will be formed. These pellets can then be collected and stored until they are ready to be spread over fields. You can learn more to get here.

dic pelletizer for sale

Maintenance of a Chicken Manure Disc Pelletizer

Like any piece of machinery, a chicken manure disc pelletizer requires regular maintenance to ensure that it is functioning correctly. The blades need to be sharpened or replaced periodically, and the machine should be cleaned after each use to prevent the buildup of residue. In addition, it is important to regularly inspect the machine for any signs of wear or damage.

Conclusion

A chicken manure disc pelletizer is an essential tool for any farmer who wants to turn waste into a valuable resource. By compressing composted chicken manure into small pellets, the machine creates a uniform product that can be easily spread over fields. This not only provides a slow-release source of nutrients for crops but also helps to reduce odor. With proper use and maintenance, a chicken manure disc pelletizer can be a highly effective and efficient addition to any farm. If you are interested in this machine , you can visit https://www.granulatorforfertilizer.com/disc-pelletizer-for-sale/.

cow dung pellet making machine

Cow dung pellet making machines are becoming increasingly popular among farmers and livestock owners as a way to manage cow dung waste and create a valuable source of fuel. Cow dung is a rich source of organic matter and nutrients, but if not properly managed, it can create a number of environmental and health hazards. Pelletizing cow dung offers a solution to these problems, providing a clean, efficient and renewable fuel source that can be used for heating and cooking.

Windrow compost turner for organic waste

A cow dung pellet making machine is a device that compresses cow dung into small, cylindrical pellets that can be used as fuel. The machine works by first drying the cow dung, then crushing it into a fine powder and finally compressing it into pellets. The pellets are then cooled and dried before being packaged and sold.

The process of making cow dung pellets has several benefits. First, it reduces the amount of waste that is produced by cows, which can be a significant environmental problem. Cow dung can release harmful gases like methane and ammonia when left untreated, which can contribute to air pollution and global warming. By turning cow dung into pellets, farmers can reduce the amount of waste that they produce and mitigate these environmental hazards.

Second, cow dung pellets are a renewable and sustainable fuel source. Unlike fossil fuels, which are finite resources that will eventually run out, cow dung is a readily available resource that can be replenished each year. Pelletizing cow dung offers a way to harness this renewable energy source and reduce our dependence on non-renewable fossil fuels.

Third, cow dung pellets are a clean and efficient fuel source. They burn hotter and cleaner than raw cow dung, producing less smoke and emissions. This makes them a more environmentally friendly option for heating and cooking, particularly in rural areas where traditional fuels like wood and coal are often used.

There are several different types of cow dung pellet making machines available on the market, each with its own unique features and benefits. Some machines are small and portable, designed for use on small farms or homesteads. Others are larger and more industrial, suitable for use on large-scale livestock operations or in commercial pellet production facilities.

When choosing a cow dung pellet making machine, it’s important to consider a number of factors. First, the machine should be able to handle the volume of cow dung that you produce. If you have a small farm with only a few cows, a smaller machine may be sufficient. However, if you have a large herd, you may need a larger, more industrial machine.

Second, you should consider the quality of the pellets that the machine produces. The pellets should be uniform in size and shape, and should be able to hold together without crumbling or breaking apart. If the pellets are too loose or crumbly, they may not burn efficiently, reducing their value as a fuel source.

Finally, you should consider the cost and maintenance requirements of the machine. Cow dung pellet making machines can range in price from a few hundred dollars to several thousand dollars, depending on their size and features. Additionally, some machines may require more frequent maintenance or repairs than others, which can add to the overall cost of ownership.

In conclusion, cow dung pellet making machines offer a number of benefits to farmers and livestock owners. By converting cow dung into a valuable fuel source, these machines can help reduce waste, promote sustainability, and provide a clean and efficient source of energy for heating and cooking. When choosing a cow dung pellet making machine, it’s important to consider factors like volume, quality, and cost, to ensure that you choose a machine that meets your needs and budget.

You can check this page for more about !

Cow Dung Pellet Making Machine

Manure Bagging Machine in Your Fertilizer Production Line

If you are in the business of producing organic fertilizers, you know how important it is to have a reliable and efficient system in place. One vital component of any fertilizer production line is a manure bagging machine. This machine is specifically designed to fill bags with granular or powder fertilizers, including those made from manure, which can then be easily transported and distributed to customers.

Why Use a Manure Bagging Machine?

Using a manure bagging machine has numerous advantages. Firstly, it saves time and labor costs since the process of manually bagging fertilizers can be time-consuming and require multiple workers. A manure bagging machine can fill multiple bags at once, greatly increasing productivity and efficiency.

Secondly, using a manure bagging machine also helps to ensure consistent bag weights and filling accuracy, which is critical in ensuring customer satisfaction and avoiding complaints. The machine can be programmed to dispense a specific amount of fertilizer into each bag, making it easier to control the quality and quantity of the product.

Lastly, using a manure bagging machine can also help to reduce waste and save money. When filling bags manually, there is a higher risk of spills, which can result in wasted product and higher costs. A bagging machine can help to minimize spills and reduce the amount of product that is lost.

manure bagging for sale
                                          manure bagging for sale

Types of Manure Bagging Machines

There are several types of manure bagging machines available in the market, each designed to meet different production needs and requirements. Some of the most common types include:

  1. Automatic Manure Bagging Machine: This type of machine is fully automated and can fill bags with fertilizer at a high speed. It is suitable for large-scale production and can handle bags of different sizes.
  2. Semi-Automatic Manure Bagging Machine: This type of machine requires some manual input, such as placing bags on the filling station and removing filled bags. It is suitable for small to medium-sized production.
    Get more information to click here.

Choosing the Right Manure Bagging Machine for Your Production Line

Choosing the right manure bagging machine for your production line will depend on several factors, including your production needs, budget, and the type of fertilizer you are producing. It is important to consider the following factors when choosing a machine:

  1. Bag Size and Type: Consider the size and type of bags you will be using to ensure that the machine can handle them.
  2. Speed and Capacity: Consider the production volume and speed of the machine to ensure it can keep up with your production needs.
  3. Accuracy: Consider the accuracy of the machine in filling bags to avoid under or overfilling.
  4. Maintenance and Support: Consider the maintenance and support offered by the manufacturer to ensure that the machine is reliable and can be easily repaired if needed.

In conclusion, a manure bagging machine is a vital component of any fertilizer production line. It can save time, reduce labor costs, ensure accuracy and consistency, and help to reduce waste. There are several types of machines available, and choosing the right one will depend on your specific production needs and requirements. By investing in a high-quality manure bagging machine, you can ensure that your fertilizer production line runs smoothly and efficiently. For details you can visit https://www.fertilizerproductionproject.com/manure-bagging-for-sale/.

How to Prepare Granular Fertilizer in Your Disc Granulator Fertilizer Production Line?

Disc granulator fertilizer production line is a widely used method of preparing granular fertilizers. Granular fertilizers are much easier to store and apply than powdered fertilizers. A disc granulator fertilizer production line is a simple and efficient way of producing granular fertilizers. This method is ideal for farmers and agricultural businesses who want to improve crop yield and quality.

Selecting the Right Materials

The first step in preparing granular fertilizer is selecting the right materials. A disc granulator fertilizer making plant can use a wide variety of materials such as nitrogen, phosphorus, and potassium fertilizers. Organic materials such as animal waste, crop residues can also be used. When selecting materials, it is important to consider the nutrient content, particle size, and moisture content. The nutrient content of the materials will determine the final nutrient content of the fertilizer. The particle size and moisture content will affect the granulation process.

Mixing System

Once the materials have been selected, they should be mixed thoroughly. A disc granulator fertilizer production line can use a mixer to combine the materials. The manure mixer should be able to blend the materials evenly and ensure that each particle is coated with the fertilizer. The moisture content of the mixture should be between 25% and 30% to ensure proper granulation.

Feeding the Materials

The mixed materials should be fed into the disc granulator fertilizer production line. The disc granulator is a machine that rotates and rolls the mixture into granules. The disc granulator fertilizer production line can adjust the angle of the disc to control the size and shape of the granules. The size of the granules should be between 2mm and 6mm.

Drying the Granular Fertilizer

After the granules have been formed, they should be dried to remove any excess moisture. The drying process can be done using a rotary dryer or a fluidized bed dryer. The temperature and airflow should be controlled to ensure that the granules are dried evenly and do not become damaged.

Cooling the Granules

Once the granules have been dried, they should be cooled to room temperature. The cooling process can be done using a cooler machine. The cooler machine can reduce the temperature of the granules to prevent moisture buildup and improve storage stability.

Packaging the Fertilizer

The final step in preparing granular fertilizer is bagging the granules. The packaging process can be done using a packaging machine. The packaging machine can weigh and package the granules into bags or containers. The packaging should be airtight to prevent moisture buildup and improve storage stability.

In conclusion, preparing granular fertilizer in a disc granulator fertilizer production line is a simple and efficient way of producing high-quality fertilizer. The key to success is selecting the right materials, mixing them thoroughly, feeding them into the disc granulator, drying and cooling the granules, and packaging them in airtight containers. By following these steps, farmers, gardeners, and agricultural businesses can improve crop yield and quality while reducing waste and improving sustainability.

Click here:https://www.fertilizerproductionproject.com/disc-granulator-fertilizer-production-line/

Email us:info@fertilizerproductionproject.com

How To Start Organic Fertilizer Plant At A Favorable Price

The idea to start organic fertilizer plant at a favorable price is a very good one if you are a business minded person. There are plenty of opportunities to be had here, it all comes down to understanding the market and knowing how to approach things. It’s definitely a challenge at first, but there are a few things to keep in mind.

Study the market

If you study the market when you want to setup organic fertilizer making plant, you will know the average selling price. So if you buy the plant, you will know what rates are there. You can also buy a plant and just modify it to fit the organic fertilizer manufacturing approach. Regardless, knowing the market is important and you have to consider that.

Ensure that you have the right source of materials

In this case it can be manure, egg shells and a variety of compounds, even leaves. You want to see the type of manure you want to make as that can help you design specific fertilizer product making lines. On top of that, you also want to see if there is enough space to pile up waste, mix and then compost everything.

Manure windrow composting equipment for sale

Will you offer liquid or regular fertilizer?

One of the things to consider here is the type of fertilizer that you will offer. Liquid fertilizer is usually better because you have less costs and it’s easier to store. Selling bulk to various farmers will ensure you have clients, but it certainly has its fair share of challenges  since you need not only quality fertilizer manufacturing systems, but also the capital to set things up.

Starting costs

These will vary based on the type of organic fertilizer plant you create. However, the setup costs are not the issue, getting profession fertilizer plant equipment and scaling your business is what will end up being a challenge. Some people started in a small location and they went up from there. If you want to buy a building, that will automatically raise costs quite a lot. So you can start in a small establishment that you already own, and then slowly ramp up. Click here to know more about fertilizer manufacturing cost.

SX wheel type composting machine for sale

As you can see, you can start organic fertilizer plant at a favorable price and it will be totally worth it. It’s important to start small and then slowly expand. If you choose to grow too much that can lead to a variety of challenges. So it’s important to keep the scale under control and results can be very impressive. If you need more details, please check https://fertilizerequipmentmanufacturer.com/fertilizer-manufacturing-plant-cost/